[EN] Wazuh Fail2ban Integration
Hi everyone! In this article I’ll walk you through installing and configuring Fail2Ban and then show you how to integrate it with Wazuh.
Fail2Ban scans log files for repeated authentication failures and automatically bans the offending IP address. Pairing Fail2Ban with Wazuh gives you centralized visibility over those bans and unbans across all of your monitored hosts.
Installation
Update your package index and install Fail2Ban:
1sudo apt update
2sudo apt install fail2ban
Verify the installation:
1fail2ban-client --version
Configure the jail
Copy the default configuration so that updates do not overwrite your changes:
1sudo cp /etc/fail2ban/jail.conf /etc/fail2ban/jail.local
Open the new file and adjust the SSH jail settings:
1sudo nano /etc/fail2ban/jail.local
1[sshd]
2enabled = true
3maxretry = 3
4findtime = 10m
5bantime = 4h
6port     = ssh
7logpath  = %(sshd_log)s
maxretryis the number of failed attempts before a ban.findtimedefines the window in which the failures must occur (here, 10 minutes).bantimeis the length of the ban (here, 4 hours).
Enable the recidive jail
The recidive jail is a “super ban” that targets repeat offenders. If an IP address is banned multiple times within the defined window, the recidive jail enforces a longer ban.
Add the following section to /etc/fail2ban/jail.local:
1[recidive]
2enabled  = true
3filter   = recidive
4logpath  = /var/log/fail2ban.log
5bantime  = 1w
6findtime = 1d
7maxretry = 3
Manage the Fail2Ban service
Restart and enable the service so it starts automatically after reboots:
1sudo systemctl restart fail2ban
2sudo systemctl enable fail2ban
3sudo systemctl status fail2ban
Monitor Fail2Ban activity
Tail the log to watch bans and unbans in real time:
1sudo tail -f /var/log/fail2ban.log
Useful Fail2Ban commands
Ban an IP manually for the sshd jail:
1sudo fail2ban-client set sshd banip 192.168.122.1
Remove a ban:
1sudo fail2ban-client set sshd unbanip 192.168.122.1
Check the status of the sshd jail:
1fail2ban-client status sshd
Integrate Fail2Ban with Wazuh
These steps assume that the Wazuh agent is already installed on the host and that you have administrative access to the Wazuh manager.
Agent configuration
Edit /var/ossec/etc/ossec.conf on the agent so that Fail2Ban logs are forwarded to Wazuh:
1sudo nano /var/ossec/etc/ossec.conf
Add the following block inside the <ossec_config> section:
1  <!-- Fail2Ban logs -->
2  <localfile>
3    <log_format>syslog</log_format>
4    <location>/var/log/fail2ban.log</location>
5  </localfile>
Restart the agent to apply the change:
1sudo systemctl restart wazuh-agent
Wazuh Manager configuration
Create a custom decoder so Wazuh can parse Fail2Ban events. On the Wazuh manager:
1sudo nano /var/ossec/etc/decoders/fail2ban_decoder.xml
1<decoder name="fail2ban">
2  <prematch>[\d+]:\s*\w+\s*[\w*]</prematch>
3</decoder>
4
5<decoder name="fail2ban">
6  <parent>fail2ban</parent>
7  <regex>[(\d+)]:\s*(\w+)\s*[(\w*)]\s*(\w*)\s*(\d+.\d+.\d+.\d+)$</regex>
8  <order>process_id,log_level,jail,action,srcip</order>
9</decoder>
Next, define rules that raise alerts when Fail2Ban bans or unbans an IP:
1sudo nano /var/ossec/etc/rules/fail2ban_rules.xml
 1<group name="fail2ban,">
 2  <rule id="100200" level="10">
 3  <decoded_as>fail2ban</decoded_as>
 4  <action>Ban</action>
 5  <description>Fail2Ban has banned an IP address: $(srcip) from jail: $(jail)</description>
 6  <group>authentication_failure,</group>
 7  </rule>
 8</group>
 9
10<group name="fail2ban,">
11  <rule id="100201" level="10">
12  <decoded_as>fail2ban</decoded_as>
13  <action>Unban</action>
14  <description>Fail2Ban: IP $(srcip) unbanned from $(jail)</description>
15  <group>authentication_success,</group>
16  </rule>
17</group>
Reload the manager so the new decoder and rules take effect:
1sudo systemctl restart wazuh-manager
Demo
After three consecutive failed SSH attempts, Fail2Ban bans the source IP and writes the action to /var/log/fail2ban.log:
1root@ubuntu:/home/ubuntu# sudo tail -f /var/log/fail2ban.log
22025-11-07 12:37:03,368 fail2ban.filter [19120]: INFO Added logfile: '/var/log/fail2ban.log' (pos = 5028, hash = 7da26e49e5d59ab5d52aa865cdadf09d676ae0d1)
32025-11-07 12:37:03,370 fail2ban.jail [19120]: INFO Jail 'sshd' started
42025-11-07 12:37:03,372 fail2ban.jail [19120]: INFO Jail 'recidive' started
52025-11-07 12:37:32,273 fail2ban.filter [19120]: INFO [sshd] Found 192.168.1.148 - 2025-11-07 12:37:31
62025-11-07 12:37:41,859 fail2ban.filter [19120]: INFO [sshd] Found 192.168.1.148 - 2025-11-07 12:37:41
72025-11-07 12:37:45,858 fail2ban.filter [19120]: INFO [sshd] Found 192.168.1.148 - 2025-11-07 12:37:44
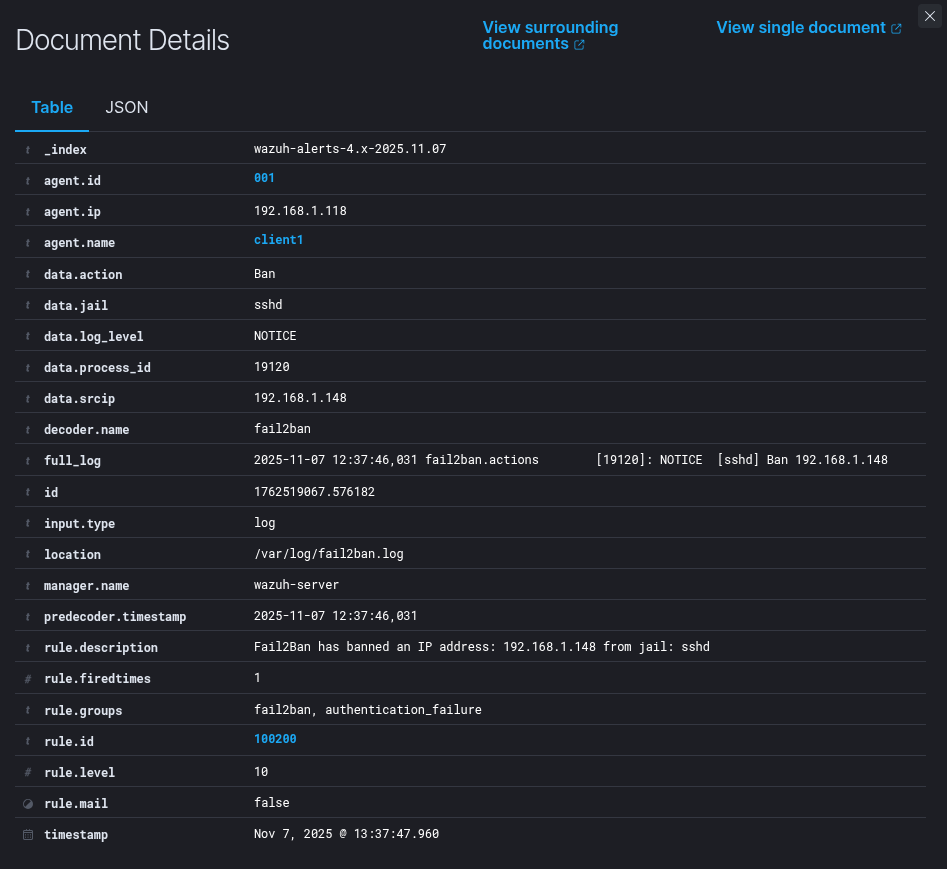
82025-11-07 12:37:46,031 fail2ban.actions [19120]: NOTICE [sshd] Ban 192.168.1.148
92025-11-07 12:37:46,034 fail2ban.filter [19120]: INFO [recidive] Found 192.168.1.148 - 2025-11-07 12:37:46
On the Wazuh dashboard you can now visualize the event.

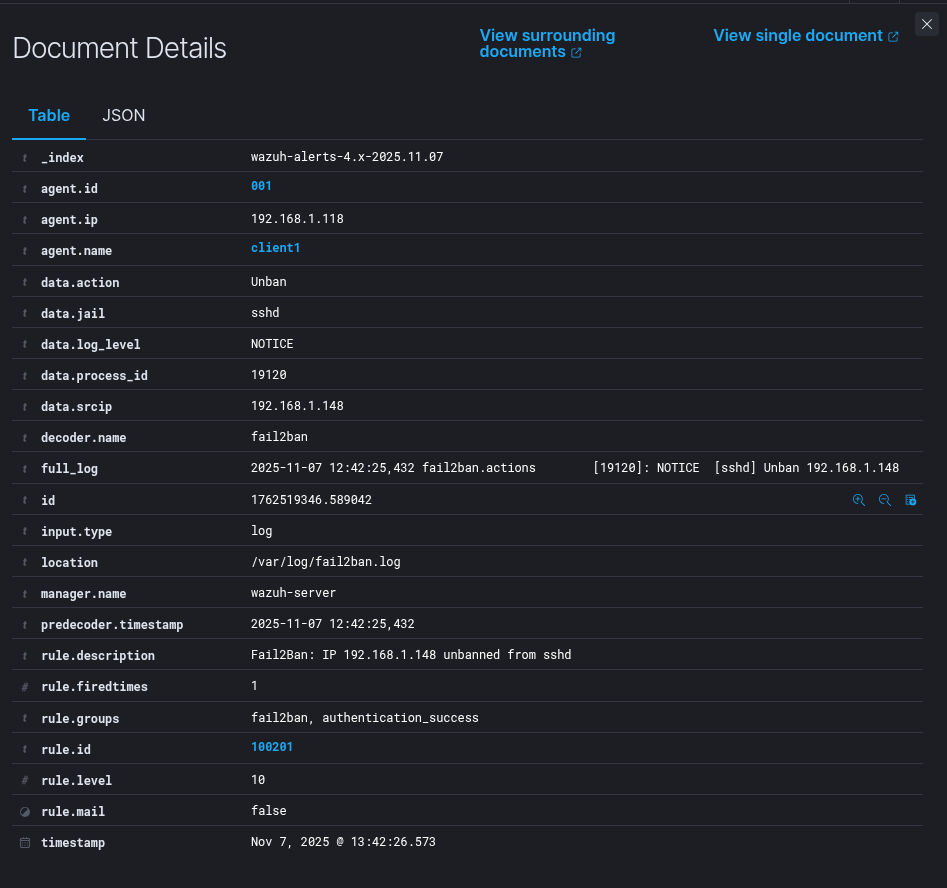
When the IP is unbanned, both Fail2Ban and Wazuh record the action:
 1root@ubuntu:/home/ubuntu# sudo tail -f /var/log/fail2ban.log
 22025-11-07 12:37:03,368 fail2ban.filter         [19120]: INFO    Added logfile: '/var/log/fail2ban.log' (pos = 5028, hash = 7da26e49e5d59ab5d52aa865cdadf09d676ae0d1)
 32025-11-07 12:37:03,370 fail2ban.jail           [19120]: INFO    Jail 'sshd' started
 42025-11-07 12:37:03,372 fail2ban.jail           [19120]: INFO    Jail 'recidive' started
 52025-11-07 12:37:32,273 fail2ban.filter         [19120]: INFO    [sshd] Found 192.168.1.148 - 2025-11-07 12:37:31
 62025-11-07 12:37:41,859 fail2ban.filter         [19120]: INFO    [sshd] Found 192.168.1.148 - 2025-11-07 12:37:41
 72025-11-07 12:37:45,858 fail2ban.filter         [19120]: INFO    [sshd] Found 192.168.1.148 - 2025-11-07 12:37:44
 82025-11-07 12:37:46,031 fail2ban.actions        [19120]: NOTICE  [sshd] Ban 192.168.1.148
 92025-11-07 12:37:46,034 fail2ban.filter         [19120]: INFO    [recidive] Found 192.168.1.148 - 2025-11-07 12:37:46
102025-11-07 12:42:25,432 fail2ban.actions        [19120]: NOTICE  [sshd] Unban 192.168.1.148

That’s all.
Thank you for taking time to read this article, I hope you’ll find this article useful.
Keep up the good work!