[EN] Wazuh ClamAV Monitoring
This guide will walk you through setting up ClamAV antivirus integrating it with Wazuh for centralized security monitoring. This setup enables automatic malware detection, detailed logging through the Wazuh security platform.
Part 1: Install ClamAV
Step 1: Install ClamAV and Dependencies
Update your package list and install ClamAV along with its daemon, update tool, and inotify utilities:
1sudo apt update
2sudo apt install clamav clamav-daemon clamav-freshclam inotify-tools -y
Package descriptions:
clamav: The ClamAV antivirus engineclamav-daemon: Background service for real-time scanningclamav-freshclam: Tool for updating virus definitionsinotify-tools: Utilities for monitoring file system events
Step 2: Stop Services for Configuration
Stop the ClamAV services before configuration to prevent conflicts:
1sudo systemctl stop clamav-daemon
2sudo systemctl stop clamav-freshclam
Step 3: Update Virus Definitions
Download the latest virus signature database. This is essential for effective malware detection:
1sudo freshclam
Note: This process may take several minutes depending on your internet connection speed. The virus database is typically 100-200 MB in size.
Step 4: Configure ClamAV Daemon
Edit the ClamAV daemon configuration file:
1sudo nano /etc/clamav/clamd.conf
Important: Comment out or remove the Example line at the top of the file if present. Then ensure these settings are configured:
# Logging
LogFile /var/log/clamav/clamav.log
LogTime yes
LogFileMaxSize 50M
LogVerbose yes
LogRotate yes

# Socket settings
LocalSocket /var/run/clamav/clamd.ctl
FixStaleSocket yes
LocalSocketGroup clamav
LocalSocketMode 666

# User
User clamav

# Scanning settings
ScanOnAccess yes
OnAccessIncludePath /home
OnAccessExcludePath /proc
OnAccessExcludePath /sys
OnAccessExcludePath /dev
OnAccessPrevention no
OnAccessExtraScanning yes
Step 5: Create Log Directory
Create the log directory structure with proper permissions for ClamAV:
1sudo mkdir -p /var/log/clamav
2sudo chown clamav:clamav /var/log/clamav
3sudo chmod 755 /var/log/clamav
4sudo touch /var/log/clamav/clamav.log
5sudo touch /var/log/clamav/scan-results.log
6sudo chown clamav:clamav /var/log/clamav/*.log
This ensures ClamAV can write logs to these files.
Step 6: Start ClamAV Services
Start and enable ClamAV services to run automatically on system boot:
1sudo systemctl start clamav-freshclam
2sudo systemctl start clamav-daemon
3sudo systemctl enable clamav-freshclam
4sudo systemctl enable clamav-daemon
Step 7: Verify ClamAV is Running
Check that both services are running properly:
1sudo systemctl status clamav-daemon
2sudo systemctl status clamav-freshclam
Part 2: Set Up Automated Scanning with Detailed Logs
Step 8: Create Scanning Script
Create a custom scanning script that will perform scheduled scans and generate detailed logs:
1sudo nano /usr/local/bin/clamav-scan.sh
Add the following content:
 1#!/bin/bash
 2
 3# Configuration
 4SCAN_DIRS="/home /var/www /tmp"
 5LOG_FILE="/var/log/clamav/scan-results.log"
 6TIMESTAMP=$(date '+%Y-%m-%d %H:%M:%S')
 7
 8# Function to log with timestamp
 9log_message() {
10    echo "[$TIMESTAMP] $1" | tee -a "$LOG_FILE"
11}
12
13# Start scan
14log_message "=== ClamAV Scan Started ==="
15log_message "Scanning directories: $SCAN_DIRS"
16
17# Perform scan and capture results
18SCAN_OUTPUT=$(clamscan -r -i --log=/tmp/clamscan_temp.log $SCAN_DIRS 2>&1)
19SCAN_EXIT_CODE=$?
20
21# Extract summary
22INFECTED=$(echo "$SCAN_OUTPUT" | grep "Infected files:" | awk '{print $3}')
23SCANNED=$(echo "$SCAN_OUTPUT" | grep "Scanned files:" | awk '{print $3}')
24
25# Log results
26cat /tmp/clamscan_temp.log >> "$LOG_FILE"
27log_message "Scan completed - Scanned: $SCANNED files, Infected: $INFECTED files"
28
29# If infected files found, log alert
30if [ "$INFECTED" != "0" ] && [ -n "$INFECTED" ]; then
31    log_message "ALERT: Malware detected! $INFECTED infected file(s) found!"
32    log_message "Details:"
33    grep "FOUND" /tmp/clamscan_temp.log | tee -a "$LOG_FILE"
34fi
35
36log_message "=== ClamAV Scan Finished ==="
37echo "" >> "$LOG_FILE"
38
39# Cleanup
40rm -f /tmp/clamscan_temp.log
41
42exit $SCAN_EXIT_CODE
Make it executable:
1sudo chmod +x /usr/local/bin/clamav-scan.sh
Step 9: Set Up Scheduled Scanning (Cron Job)
Configure automatic scheduled scans using cron. Edit the root crontab:
1sudo crontab -e
Option 1: Daily scan at 2 AM (recommended for most environments):
0 2 * * * /usr/local/bin/clamav-scan.sh
Option 2: Hourly scans (for high-security environments):
0 * * * * /usr/local/bin/clamav-scan.sh
Option 3: Multiple times per day (e.g., every 6 hours):
0 */6 * * * /usr/local/bin/clamav-scan.sh
Note: More frequent scans provide better security but consume more system resources.
Step 10: Test the Scanning Script
Run the script manually to verify it works correctly:
1sudo /usr/local/bin/clamav-scan.sh
Check the log file to verify the scan completed successfully:
1sudo cat /var/log/clamav/scan-results.log
You should see output similar to:
[2024-01-20 10:30:00] === ClamAV Scan Started ===
[2024-01-20 10:30:00] Scanning directories: /home /var/www /tmp
[2024-01-20 10:35:00] Scan completed - Scanned: 12345 files, Infected: 0 files
[2024-01-20 10:35:00] === ClamAV Scan Finished ===
Part 3: Install and Configure Wazuh Agent
Step 11: Install Wazuh Agent
Installation method (using Wazuh repository):
 1# Add Wazuh repository
 2curl -s https://packages.wazuh.com/key/GPG-KEY-WAZUH | gpg --no-default-keyring --keyring gnupg-ring:/usr/share/keyrings/wazuh.gpg --import && \
 3chmod 644 /usr/share/keyrings/wazuh.gpg && \
 4echo "deb [signed-by=/usr/share/keyrings/wazuh.gpg] https://packages.wazuh.com/4.x/apt/ stable main" | tee -a /etc/apt/sources.list.d/wazuh.list
 5
 6# Install agent
 7sudo apt update
 8sudo WAZUH_MANAGER='<wazuh-manager-ip>' \
 9     WAZUH_AGENT_GROUP='<agent-group>' \
10     WAZUH_AGENT_NAME='<agent-name>' \
11     apt install wazuh-agent -y
Step 12: Configure Wazuh Agent to Monitor ClamAV Logs
Edit the Wazuh agent configuration file to monitor ClamAV log files:
1sudo nano /var/ossec/etc/ossec.conf
Locate the <ossec_config> section and add the following configuration before the closing </ossec_config> tag:
 1  <!-- ClamAV Log Monitoring -->
 2  <localfile>
 3    <log_format>syslog</log_format>
 4    <location>/var/log/clamav/clamav.log</location>
 5  </localfile>
 6
 7  <localfile>
 8    <log_format>syslog</log_format>
 9    <location>/var/log/clamav/scan-results.log</location>
10  </localfile>
Step 13: Restart Wazuh Agent
Reload systemd, enable the agent to start on boot, and start the service:
1sudo systemctl daemon-reload
2sudo systemctl enable wazuh-agent
3sudo systemctl start wazuh-agent
Step 14: Check Wazuh Agent Status
Verify the agent is running and connected to the manager:
1sudo systemctl status wazuh-agent
Check agent connection status:
1sudo /var/ossec/bin/agent_control -l
You should see your agent listed with status “Active”. If the agent is not connecting, check the logs:
1sudo tail -f /var/ossec/logs/ossec.log
Part 4: Configure Wazuh Manager for ClamAV Alerts
Step 15: Add ClamAV Detection Rules on Wazuh Manager
Important: These steps must be performed on the Wazuh Manager server, not on the agent.
SSH into your Wazuh Manager and create or edit the local rules file:
1sudo nano /var/ossec/etc/rules/local_rules.xml
If the file doesn’t exist, create it with the following structure. Add these custom rules for ClamAV detection:
 1<!-- ClamAV Detection Rules -->
 2<group name="clamav,malware,">
 3
 4 <!-- Rule for scan started -->
 5 <rule id="100101" level="3">
 6   <decoded_as>clamav-started</decoded_as>
 7   <description>ClamAV: Scan initiated</description>
 8 </rule>
 9
10 <!-- Rule for scan completed with summary -->
11 <rule id="100102" level="3">
12   <decoded_as>clamav-summary</decoded_as>
13   <field name="infected_files">^0$</field>
14   <description>ClamAV: Scan completed successfully - Scanned: $(scanned_files) files, No infections found</description>
15 </rule>
16
17 <!-- Rule for malware detection alert -->
18 <rule id="100103" level="12">
19   <decoded_as>clamav-malware</decoded_as>
20   <description>ClamAV: ALERT - $(infected_count) infected file(s) detected!</description>
21   <group>malware_detected,pci_dss_11.4,gdpr_IV_35.7.d,hipaa_164.312.b,nist_800_53_SI.3,tsc_CC6.8,tsc_CC7.2,</group>
22 </rule>
23
24 <!-- Rule for individual infected file detection -->
25 <rule id="100104" level="10">
26   <decoded_as>clamav-file-infected</decoded_as>
27   <description>ClamAV: Malware found - $(virus_name) in $(file_path)</description>
28   <group>malware_detected,pci_dss_11.4,gdpr_IV_35.7.d,hipaa_164.312.b,nist_800_53_SI.3,</group>
29 </rule>
30
31 <!-- Critical alert for multiple infections -->
32 <rule id="100105" level="15">
33   <if_sid>100103</if_sid>
34   <field name="infected_count">^[2-9]$|^\d{2,}$</field>
35   <description>ClamAV: CRITICAL - Multiple infections detected ($(infected_count) files)</description>
36   <group>malware_detected,critical,pci_dss_11.4,gdpr_IV_35.7.d,</group>
37 </rule>
38
39 <!-- Rule for scan completed WITH infections -->
40 <rule id="100106" level="12">
41   <decoded_as>clamav-summary</decoded_as>
42   <field name="infected_files">^[1-9]\d*$</field>
43   <description>ClamAV: Scan completed - $(scanned_files) files scanned, $(infected_files) INFECTED files found</descript
44ion>
45   <group>malware_detected,pci_dss_11.4,gdpr_IV_35.7.d,</group>
46 </rule>
47
48</group>
Step 16: Add ClamAV Decoder on Wazuh Manager
Create or edit the local decoder file on the Wazuh Manager:
1sudo nano /var/ossec/etc/decoders/local_decoder.xml
If the file doesn’t exist, create it. Add the following decoders to parse ClamAV log messages:
 1<!--
 2 - Local decoders
 3 - Copyright (C) 2015, Wazuh Inc.
 4-->
 5
 6<decoder name="clamav-started">
 7 <prematch>ClamAV Scan Started</prematch>
 8</decoder>
 9
10<decoder name="clamav-summary">
11 <prematch>Scan completed</prematch>
12 <regex>Scan completed - Scanned: (\d+) files, Infected: (\d+) files</regex>
13 <order>scanned_files,infected_files</order>
14</decoder>
15
16<decoder name="clamav-malware">
17 <prematch>ALERT: Malware detected</prematch>
18 <regex>ALERT: Malware detected! (\d+) infected file</regex>
19 <order>infected_count</order>
20</decoder>
21
22<decoder name="clamav-file-infected">
23 <prematch>FOUND</prematch>
24 <regex>(\S+): (\S+) FOUND</regex>
25 <order>file_path,virus_name</order>
26</decoder>
Step 17: Restart Wazuh Manager
After adding the rules and decoders, restart the Wazuh Manager to apply the changes:
1sudo systemctl restart wazuh-manager
Verify the manager started successfully:
1sudo systemctl status wazuh-manager
Note: It may take a few moments for the manager to fully restart and reload all configurations.
Part 5: Test the Complete Setup
Step 18: Create a Test Virus File on the Agent
Warning: The EICAR test file is a harmless test file used to verify antivirus functionality. It is not a real virus but is detected by all antivirus software.
On your Ubuntu agent, download the EICAR test file:
1cd /tmp
2wget https://files.trendmicro.com/products/eicar-file/eicar.com
Note: This file is intentionally detected as malware by ClamAV for testing purposes.
Step 19: Run a Manual Scan
Execute the scanning script to detect the test file:
1sudo /usr/local/bin/clamav-scan.sh
Step 20: Check the Logs
On the Ubuntu Agent:
Check ClamAV scan results:
1sudo tail -30 /var/log/clamav/scan-results.log
Check Wazuh agent logs for any errors:
1sudo tail -f /var/ossec/logs/ossec.log
On the Wazuh Manager:
Check if alerts are being generated:
1sudo tail -f /var/ossec/logs/alerts/alerts.log | grep -i clamav
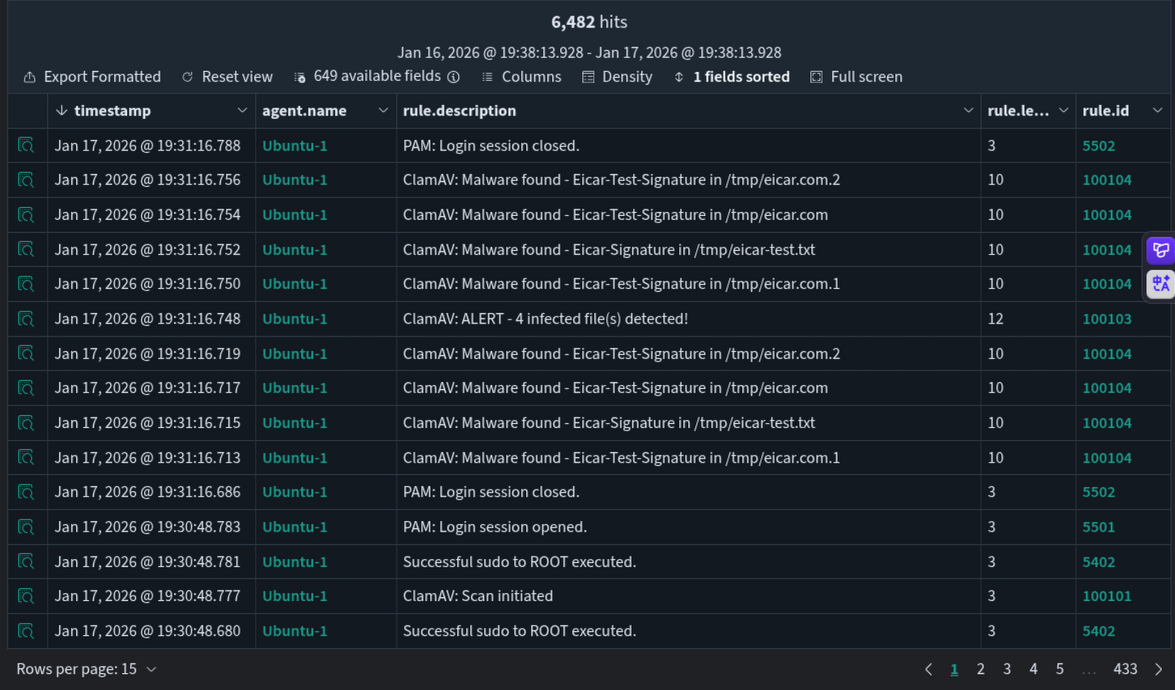
You should see alerts with level 10, 12, or 15 indicating malware detection.
Step 21: View Alerts in Wazuh Dashboard
You should see alerts for the detected EICAR test file.
Thank you for taking the time to read this article. I hope you find it useful.
Keep up the great work!